

TABLE OF CONTENTS

FOLLOW
Sometimes we want to perform operations outside the scope of this data flow process, like interacting with an API. These operations are called side effects. In this article, we will explore how to handle side effects in React using a hook called useLayoutEffect.
React’s data flow process is pretty straightforward. It breaks down a user interface into components, builds a tree of elements, and makes necessary updates to the DOM based on modifications in those components. However, sometimes we want to perform operations outside the scope of this data flow process, like interacting with an API. These operations are called side effects.
A “side effect” is anything that results in observable changes after a function has finished running, apart from the return value of the function itself.
Common side effects include network requests, data-fetching, and manual DOM mutations.
In this article, we will explore how to handle side effects in React using a hook called useLayoutEffect.
Prerequisites
To understand this article, we need the following:
- Good knowledge of functional programming using JavaScript and React.
Experience with React useEffect.
What is useLayoutEffect?
According to React’s official documentation:
- The signature is identical to useEffect, but it fires synchronously after all DOM mutations.
To understand this better, let’s take a look at useEffect's function signature:
useEffect takes in two arguments:
- A callback function containing the side effect logic.
- An array of dependencies that trigger the callback when updated between renders. If there are no dependencies, it stays as an empty array.
Let’s compare it to useLayoutEffect's function signature:
useLayoutEffect vs useEffect - the difference
As we’ve seen so far, both hooks are identical and, in most cases, can even be used interchangeably. But, there’s one key difference between them: execution time. Take a look at the diagrams below:

In useEffect, when a user triggers a render (by updating state or props), React updates the screen, and the useEffect callback function runs asynchronously in the background.

In useLayoutEffect, the callback function runs synchronously before the screen is updated.
Let’s see an example that illustrates these concepts better. Take a look at the code below:
In the code above:
- We created a component implementing the useEffect hook and the useLayoutEffect hook.
- Each hook logs a string to the console to help us identify the hook type.
Let’s take a look at the console:

As we can see here, since useLayoutEffect runs synchronously before the DOM updates, its result will be ready for the console first.
After the DOM updates, useEffect will run asynchronously and display its results on the console.
When to use useLayoutEffect
In most cases, to make our app faster and more performant, it is recommended to handle side effects with useEffect since it executes after the DOM updates, preventing blocking issues on the browser.
However, when we need to do something based on the layout of our DOM and there are visual inconsistencies with useEffect, it is best to use useLayoutEffect.
For example, let’s create a button that will display a colored rectangle when clicked.
Here’s its implementation with useEffect:
In this code:
- We set the default state of the rectangle to false using useState.
- We used useRef to refer to our rectangle div, allowing us to apply side effects on it using useEffect.
- We wrote some markup for displaying the rectangle at the click of the button. The button will change display's state from true to false and vice versa.
- We used useEffect to style the rectangle after render.
Here’s the result:

Notice that when the button is clicked, the rectangle displays with its initial background color of red, and quickly changes to green from the useEffect. The top margin of the rectangle also gets updated.
For a smoother effect, it will be better to use useLayoutEffect like this:
Here’s the result:
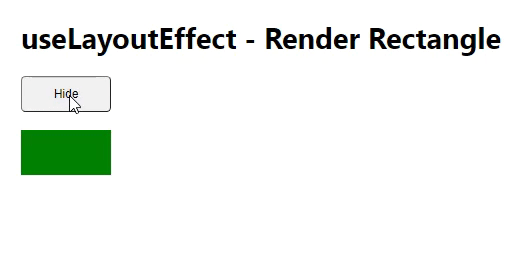
As we can see, there are no color or position glitches in this one.
Conclusion
In this article, we learned what useLayoutEffect is used for, when to use it, and how. For most use cases, it is a good idea to stick with useEffect, but feel free to use useLayoutEffect as the need arises.
To see the demos used in the article, check the CodeSandbox below:
https://codesandbox.io/embed/uselayouteffect-fenjtg?fontsize=14&hidenavigation=1&theme=dark


.png)

